Showing posts with label Polychromo Pencils. Show all posts

Sunday, 5 March 2017

30 Coloring Challenge

Hello!

It's March already, time flies doesn't it? Have you heard about Kathy's 30 day colouring challenge? I believe this challenge is one of the best ones, it encourages you to color which is so therapeutic, at least for me! If you want to join in the fun, just color something and share it on the social media. Easy and fun! Many companies are also running promotions, if you are interested what Altenew is offering, please, see the end of this blog post. There's a fun blog hop running though the 10th of this month! 


I used Altenew stamps for my project. Actually this card was custom made for a girl whose name is Maj. I used Remember This- stamp set. I used Altenew Frosty Pink Ink to stamp my flowers and for the leaves I used Altenew Morning Frost Ink. I coloured the flowers and the leaves first with copic markers and then added details with pencils. I die cut the letters using Bold Alphabet Die set. I cut six times each of the letters, coloured one of the letters to match to my flowers with a copic marker and then glued them together. For my finishing touch I added a piece of Altenew Pale Grey card stock at the bottom of my card and stamped the sentiment under the die-cut letters.


Here's some details and offers what Altenew is promoting at the moment:

1. FREE GIFT with every order from Coloring Challenge Collection (3/2-3/5)
  • Receive a FREE Apple Tree Stamp Set when you order stamps from the Coloring Challenge Collection! No need to add to cart, will automatically ship with orders. Limit one per customer, while supplies last. Not applicable on previous orders. Offer ends on Sunday 3/5, 2017 at 11:59 PM EST.

2. Giveaway, over $100 in products (3/2-3/10)

Tuesday, 5 January 2016

Whimsical Flowers for my Friend

Hello!

Firstly, I had a special post on posted on before Christmas. I asked if I could send a card to one of you and so many of you said yes! Thank you so much! You gave such a warm Christmas gift!

I randomly chose the recipient with the help of random number generator and the number given to me was 32! 


The 32nd comment was left by Teresa Doyle! I didn't find your email address linked to you comment, so if this message finds you, would you be so kind and send me an email with you mailing address. It would be my pleasure to send you some happy mail. 


Today, I'm also at the Altenew blog today to do a video by request. About a year ago, I made a guest design post in the Altenew blog and on the second post I used Whimsical flowers and coloured them with coloured pencils. Since I started to make videos, a tutorial how I coloured the flowers was asked, and I did made it twice and twice I got my head on the way while filming.. I mean it just didn't popped in and out - it kinda stayed! I used to be one of those that colour a nose attached to the paper - since filming I had to learn out of it.

So now it is finally here:


This video tutorial is the first after the three month long break in filming and editing, so there are some funny things, so please bear with me. You can watch it here or in HD in YouTube.


Supplies:
Stamps: Whimsical Flowers and Birch Land Finnish
Dies: Shutter Cover Die and Whimsical Flowers co-ordinating die, Pierced Rectangles by MFT
Inks: Buttercream and Frayed Leaf Altenew Crisp Inks, Versafine Onyx Black
Card Stock: Simon Says Stamp Cream Coloured Card Stock
Sequins: Simon Says Stamp Clear Mix Sequins

Faber-Castell Polychrome Pencils: Flowers: Ivory (103) - Naples Yellow (185) -Burnt Ochre (187) - Burnt Siena (283), Darl Cadmium Orange (115), Leaves:  May Green (170)Earth Greem Yellowish (168) - Chromium Green Opaque (174) - Olive Green Yellowish (173) - Cadmium Yellow Lemon (205)

Thank you so much for stopping by today! Have a great day!

Hugs,
Marika

Tuesday, 22 December 2015

Happy Holidays and a GIVEAWAY!

Hello!

This is my second post for today, please check out the collaboration post with Pia from Pia's Creative World. You can see it HERE. We also have a video tutorial how we made our collaboration project.

I'm also at Altenew blog to share my last post for the year of 2015. Within this card I want to wish Happy Holidays for all my Altenew friends. Please, enjoy the holidays and cherish the time with friends and families.


I used Poinsettia and Pine set to make this CAS card. Firstly I stamped the images with light brown and light green ink and then coloured the images with copic markers and coloured pencils. The background is firstly stamped with Woodpalet Background onto a smoke card stock with Versamark Ink and then heat embossed with Vanilla White Embossing PowderThe background.

I started blogging about a year and a half ago and this journey here in blogland has been such an amazing experience for me. I have met so many kind people whom I can call my friends now although we live in different countries - even continents. I truly appreciate all the love and support that you have given me and because of your encouragement I have become better in crafting, colouring and drawing since I always want to give the best of me to you. Finding out that I have that kind of skills in colouring, has been one of the biggest discoveries for me and without the support of this loving crafting community, I may never have found it. So thank you all of you! 


I would like to send you all a thank you card but that is just impossible. So within this project, I would like to say thank you to you all. And I would like to send this to someone, so if you like to receive this item, please leave a comment on this blog post before the 29th of December 2015. I will randomly draw the person whom I'm sending this and I will announce it soon after. I'm also having a giveaway over at Altenew Blog, if you want to participate please head over there to enter into the drawings.

If you wish to see a video tutorial on this technique that I used to colour the Rose piece, you can watch the speed colouring video HERE and a similar card made in this following tutorial. You can find it HERE

Thank you for stopping by today. Please, check out our collaboration project with Pia as well, we really had fun within that project. I also have a few holiday cards to share which I will do over the holidays. They are holiday cards but can be used as everyday cards as well. 

Hugs,
Marika

Sunday, 13 December 2015

Festive Christmas

Hello,

I'm here.. again! :)  You can't believe how much fun I've had during the last two weeks, I've played a long with many challenges and I can say, I've had a blast. I've missed playing along and what I've noticed, these card challenges are a such a great source of inspiration. 

So today's card is made inspired mainly by Fusion - Season's Greetings. I went for the inspiration picture and tried to use as many elements as I possible could. At the same time, over at the Paper Players there's a new colour challenge so I tried to use only those colours. So here's my take:

Stamps used: BirchWinter Bough and Handwritten Holiday

Well, I started with the woodgrain background. I can't believe how identical it looks to Altenew's Woodgrain Palet Background heat embossed vanilla white EP onto SSS Smoke card stock. I love the look! Just beautiful! Then I took a stripe of red card stock and white jelly roll pen and tried to mimic the pattern seen on the table cloth. In the inspiration picture, there's this bird but I so wanted to use this little cute bunny. I think he is so darn adorable. Oh and I used a stencil to ink up the little red and grey dots on the background which can mimic the berries in the picture. The bunny is coloured firstly with copic markers and then added details with coloured pencils. I didn't write down the exact numbers, so I don't list them since I can't be sure. If someone is interested in the colours, please let me know - I can give a good guess. :) I was trying out a new copic combos, the hat on the bunny came to be more pink that I would have wanted. Hopefully the PP gals don't mind. 

Supplies:
Stamps: Birch, Winter Bough and Handwritten Holiday by Purple Onion Designs.
Inks: Memento Desert Sand and New Sprout and Versafine Onyx Black
Paper: Canson Bristol 250gms Smooth Card Stock, SSS Smoke Card Stock and Textured Card  Stock from Papermania.
Vanilla Opaque White Embossing Powder by WOW!
White Jelly Roll Pen

I will enter this into following Challenges:
Fusion - Season's Greetings
The Paper Players #275 - Cherry Cobbler, Mossy Meadow and Very Vanilla


Thank you for stopping by today! See you soon!

Hugs,
Marika

Saturday, 5 December 2015

Joy to the World

Hello All,

I'm here to share these two cards with Purple Onion Designs. I don't know about you, but I find it difficult to make two cards that are exactly the same. But since holiday cards are often needed more than one, I've found it easiest to use the same design but alter it a little bit. The inspiration for these two cards comes from the sky. I've had in mind this vision hat I would like to have Aurora Borealis on the sky for some Christmas cards of mine. This year we've had many beautiful moments here when the sky has just bloomed, but it turned out to be quite difficult to mimic the boldness and the softness that those beautiful blooms of the sky have. This is the best one so far. 

Stamps used: Flora, Toadstool Cluster and Handwritten Holiday


Stamps used: Fawn and Merry and Bright.
I started by stamping the images on my card panel and drew the snowbanks with copic friendly marker. Then I cut a mask for both main images and covered the stamped image. For the latter card, I also cut a mask for the moon. Then I used my ink blending tool to ink up my sky with Distress Inks. I used two shades of Distress Inks: Tumbled Glass and Stormy sky. The halos around the aurora borealis and the moon were created by leaving Tumbled Glass to show; that is for all the darkers areas seen, I laid second layer of Stormy Sky on to firstly laid Tumbled Glass. Do I make any sense here? I made Flora-card first and after I had made it I realised that in real life if there is snow on the ground and clear sky during the night, the moon light is reflected from the snow. So on the Fawn- card I left a bit of white to show near the snowbanks to make it more real. 

Next I coloured the images with copic markers, I'll list the all the colours in the supplylist below. In the Flora-card I really didn't think the direction of the light source but in the Fawn-card I practiced back-lit shading. I added more highlight with white jelly roll pen and used that to add the stars to the sky as well. Not really sure if the shadows or highlights are in correct places, but it was quite hard learning experience for me to really think where to put the shadows and highlights. 

In the Flora-card I created the Aurora Borealis with Faber-Casstell Polychromo pencils with many different shades of green and yellow. The sentiments were then stamped with black pigment ink.

Just a last reminder, Purple Onion is having a sale - all stamps 25% off until tomorrow.

I saw that Addicted to CAS has the Code Word: JOY. I think the latter one might express the feeling of Joy, just love that cute critter by Stacey Yacula!! She is so joyful, isn't she? Here's the graphic:


Supplies:
Stamps: FloraToadstool Cluster, Handwritten Holiday Fawn and Merry and Bright by Purple Onion Designs.
Inks: Memento Tuxedo Black, Versafine Onyx Black, Tubled Glass and Stormy Sky Distress Inks.
Card Stock: Canson Bristol 190mgs Smooth Card Stock
White Jelly Roll pen
Copic Multiliner 0.1

Copic Markers: Flora and Fawn: E40 - E42 - E43 - E44, YR23, Scarfs: B91 - B93 - B95 - B97, Stump: E42 - E43 - E44: Toadstool and berries: R56 - R59 - E43 - E44, Shadows: 0 - N0 - N1 - N3 - Y13, Leaves: YG95 - YG97.

Thank you for stopping by today! And thank you for all lovely comments left for two earlier posts, I'll come to visit you soon! 

Hugs,
Marika

Tuesday, 27 October 2015

CASEing Kelly Blog Hop

Hello,


As you may know, Kelly Latevola from You and your big dreams, has this awesome thing in her blog. On almost every Monday, she has a new crafter, cardmaker featured at her blog. Firstly, she introduces the crafter through this little Q&A portion. (Always a lot of fun to read) and then she features three cards of the other crafter and based on those three cards, Kelly makes a CASE of her. Doesn't it sound a lot of fun and for moreover doesn't it sound the most kind thing in the crafting world? And this amazingly selfless thing that she does is called CASEing Genius.

Kelly started CASEing Genius a year ago - actually exactly a year ago. We, who has gotten the honour to be featured wanted to give a humble thank you to Kelly and congratulate her on her first anniversary of her blog feature. At least, I personally find the thing she does, is so amazingly selfless, kind and caring gesture to another human beings. This world needs more things like these - more acts of kindness. So, to say thank you to Kelly, we decided to organise a blog hop for her and to do the thing she has done - for her. In her feature, she asks the other crafter to send three cards, but we wanted this to be a surprise (Kelly loves those) so we chose three cards of hers and made a CASE based on those. So here are three cards that I found extra special in Kelly's production:


This was my first touch to Kelly's work. I saw this over at the CTS and well deservingly this was the winning card for that week's sketch. Isn't this just fabulous..?!? Love the design, the colour choices and those little black dots are.. all perfectly executed and all in their right place.


This was another wow! WOW! The frame is just splendid idea! Perfect colouring, striking colours and still yet so simply CAS. In perfection.


In my opinion, this card features Kelly at her best: she's the megatalent of using bright and bold colours without making the card look too grouded. Her colouring is fabulous and the dimension she achieves with her copics makes me want to envy her. And the last one but not the least, she always - and this is truly always - her background is super cool although it stays on the background. 

So I studied these hard and this is what I came up:

THE CASE


Well, I never can achieve the brightness of colours as Kelly has - but I tried. The rose is coloured firstly with copics and then later added details with coloured pencils. Kelly uses stencils quite often, so I went against my true nature and fought with a stencil and got out a decent execution. (Have you seen a card with a stencil from me.. not many because I really can't make them work - this being the exception to the rule.) And then I tried to come up with an idea for a frame. Kelly is fond of one-layer cards so I wanted to keep this one layer so I shaded the frame with copic markers and colours spencils. I hope you like it and I do hope you like it too, Kelly! You are a wonderful source of inspiration and your kindness really makes a difference!  

GIVEAWAY


What is a blog hop without some fun prizes?! Leave a comment by 11:59 pm EDT on Thursday, October 29th along each stop in the hop to increase your chances of winning a prize from one of our sponsors: 

Winners will be notified by email after October 29th.

GET HOPPING

If you are hopping you should have come from very talented Maria's blog and your next stop will be Martha Lucia Gomez. I included the list of all blogs in this hop if you get lost on the way. 


Marika Rahtu <--- YOU ARE HERE
Thank you so much for stopping by! Have fun hopping and good luck with the prizes! 

Hugs,
Marika

Monday, 26 October 2015

Snowflake Grove - A new release from Purple Onion Designs

Hello,


Today's the day that all POD fans have been awaiting for - A new release from Stacey Yacula is available. The new release is called The Snowflake Grove and currently you can get the whole release just $100 until 11/4/2015 or you can buy your favourites separately.  I had tons of fun with these stamps and I'll be sharing my examples within next two weeks. 

For my first card I used Birch House stamp and when I saw it for the first time it figured that if there was a house at the North Pole, that is what it would look like. Since Christmas cards are usually sent in bulk, I tried to keep the design simple enough to be easy to reproduce. 


Stamps used: Birch House and Handwritten Holiday.

First, I coloured the base layer with copic markers that I have listed below in the supplies list. Then I added a bit of details with Faber-Castell Polychromo Coloured Pencils. I blended the sky with ink blending tool and used Distress Inks for blending. I let it dry completely and the I used a stencil to create the snowflakes. I stamped through the stencil with Versamark and then heat embossed the snowflakes with a white glitter embossing powder. They look really neat. I added the snow on the ground with the same technique but used my Versamark pen for it. The die cut panel is popped up with fun foam.

Supplies:
Stamps: Birch House and Handwritten Holiday by Purple Onion Designs
Inks: Memento Tuxedo Black, Versafine Onyx Black, Faded Jeans, Stormy Sky, Chipped Sapphire, Peacock Feathers Distress Inks, Versamark.
Dies: Die-namics Pierced Rectangles by MFT
Stencil: Falling Snow stencil by SSS
Embossing Powder: Vanilla White Opaque and White Twinkle Embossing Powder by WOW!

Copic Markers: Green: YG03 - YG67, Grey: 0 - N1 - N3 - N5, Brown: E43 - E44, Yellow: YR21

Thank you so much for stopping by today and leaving me such a kind comments on my last post. I've read the through I truly appreciate your kindness. Thank you! Have a great day!

Hugs,
Marika

Tuesday, 20 October 2015

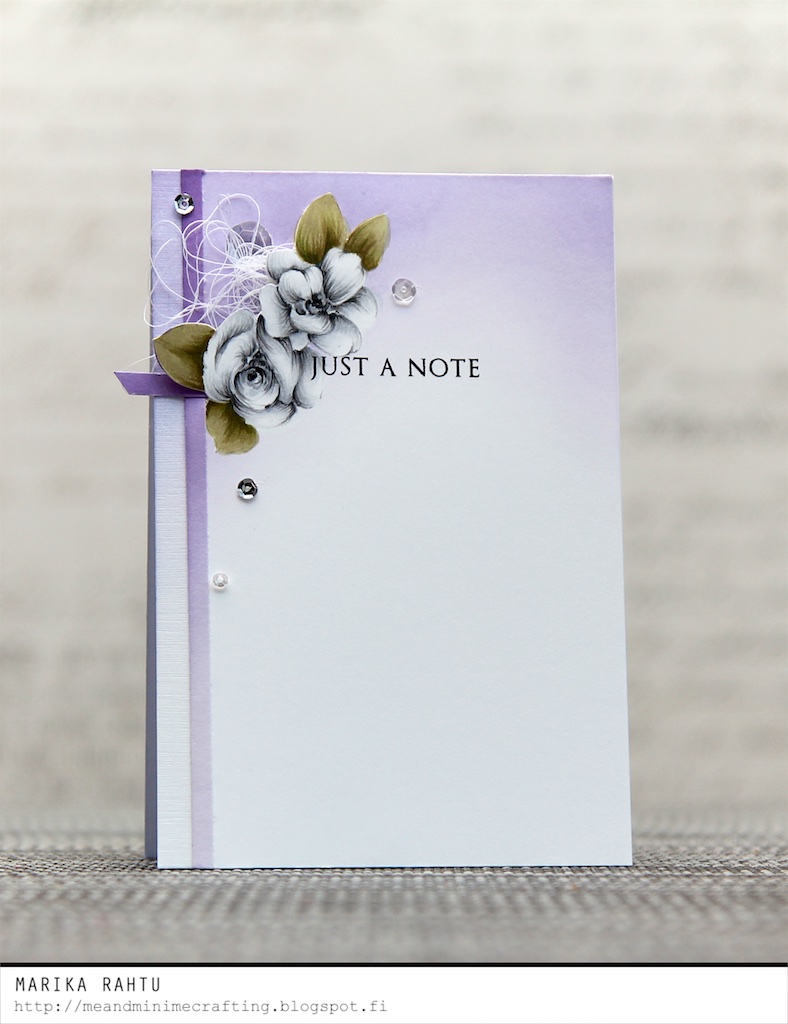
Just a Note

Hello,


I'm at the Altenew blog today to feature Painted Flowers set. I've seen such a beautiful cards made with this stamp set so this card was a challenge to try to come up something not that usual. What I haven't seen so many times is copics with this set - so I thought I'd give it ago. I added details with coloured pencils. Here is my card:


Stamps used: Painted Flowers and Lace Up.
Stamps used: Painted Flowers and Lace Up.

You can watch my video tutorial here or in HD in YouTube. 


Supplies:
Stamps: Painted Flowers and Lace Up.
Inks: Altenew Crisp Dye Inks Soft Lilac, Lavender Fields, Deep Iris and Jet Black, Hickory Smoke Distress Ink
Paper: Neenah Solar White 80lb, Linen Effect paper 150gms by WHSmith 
Sequins: Pretty Pink Posh Metallic Silver, Assorted Moonlight by SSS
White Thread

Thank you for stopping by today. See you soon!

Hugs,
Marika

Saturday, 10 October 2015

Autumn... the year's last, loveliest smile

Hello!

Hopefully you all are doing well today. I'm here to share this card that I made inspired by  Therese from Lostinpaper. Therese is one of the first crafters and Youtubers that I started to follow. I immediately fell in love with the cute critters that she featured in her cards.. And if you wonder.. yes, they were those adorable critters by Stacey Yacula. I've also learned so much from colouring just watching her colour in her amazing videos. And yesterday, can you believe, is the day that I can call her as my teammate as SHE joins in the Altenew Team! How wonderful is that? I couldn't be more pleased and thrilled! Welcome Therese! 

I wanted to celebrate this day by being inspired her cards and there are so many that I could take inspiration from. But lately Therese has made two these two cards (here) and (here) with birds in them, so I needed to go for the birds theme. Then I saw this challenge at TIME OUT Card Challenge #41 and figured this could be a good fit to there as well. 


I used Wild Hibiscus and Vintage Flowers set from Altenew to stamp and colour the main bird at the bottom. Then I drew the three flying birds first with a pencil and then coloured on top with Faber-Castell Polychromos. (Sorry for smutch on one of the birds, I messed up the colouring, tried to erase it but Polychromos doesn't quite erase that well.

Thank you for visiting, see you soon!

Hugs,
Marika


Tuesday, 29 September 2015

Polychromos on vellum

Hello,


Today I'm here just for fun.. It's been so long that I've crafted just for fun and not any kind of purpose in mind. I've been longing to participate on challenges but I've hadn't had time to do so today I visited a couple of my favourite card challenges and played around with some crafty goodness and my polychromos. Here's what I came up with.. and just a note... I had so much fun today!! YAY!


This is my entry to the Throwback Thursday #7
Less is More #243 and Inkspirational Challenge #92.


Here's another one that I made with the same technique on the butterfly. I tried to CASE Tracey's card.. This card was supposed to be very simple having just one butterfly on a inked background.. While listening my favourite music on the back I kinda got carried a way... sorry Tracey. Hopefully you don't mind.

This is my entry to the Time Out Challenge #40.


Otherwise these cards are pretty straight forward but I did experimented a new-to-me colouring technique in these cards - I used my polychromos to colour on vellum and it worked perfectly. I might a shoot a video on this if you're interested. I coloured the flowers first with copies and then added details with pencils. 

I will enter these cards for following challenges:

Throwback Thursdays #7 at Wplus9 - I used Flora and Fauna 2 by Wplus9

Less is More #243- Something Shiny - I found that White Pearl embossing powder and sequins very very shiny in real life. Quite hard to capture in photo though.

Inkspirational #92- photo inspiration - I used their fall colour theme

Time Out Challnge #40 - CASE Tracey - I was inspired by the vellum and inked background.


Supplies:
Stamps: Flora and Fauna 2 and A new day by Wplus9, Baby Zoo by Altenew
Inks: Versamark, Versafine Onyx Black, Appeltini Pure Color Die ink by Wplus9, Shabby Shutters and Scattered Straw Distress Inks, Frosty Pink and Coral Berry Crisp Inks by Altenew
Dies: Pierced Squares Die-namics by MFT
Paper: Canson Bristol 250gms, Neenah Solar White 80lb, Linen Effect paper by WHSmith, a stripe of textured light green cars stock
Vellum: Pink and light green vellum by Inspire Me
White Pearl Embossing Powder by WOW!
Sequens: Lime Sorbet and Lemon Merigue by Pretty Pink Posh, Assorted Moonshine by SSS

Polychromo Pencils: Earth Yellowish Green (168), Green Opaque (174), Black (199), Pink Madder Lake (129), Madder (142), Magenta (133), Walnut Brown (177)

Derwent Coloursoft Pencils: Orange (C070)

Copic Markers: Y15 - YR23

Thanks for stopping by today and have a wonderful day!

Marika